Home
To contact the author, comment on this site, or report a bug, go to Appendix E and choose your weapon.
1. Introduction
Let's be honest. You must be a bit daft if you want to program your shiny, new Mac in Assembly Language. After all, you have all those cool tools to get the job done: Swift, Java, Python, C, Objective-C, and so on.
> Why?
So why would you want to use 64-bit Assembly Language to program your Mac?
> Because...
- You are interested in exploring CPU internals and architecture.
- You want/need to know exactly what the computer is doing.
- You are fed up with slow, bloated software.
- A well-written assembly language program is a joy to behold.
- You are bored with Java.
- You are bored with Python.
- You are bored.
- You are unimpressed by the latest fad.
- You are disgusted by the hype.
- You are disenchanted with object-oriented programming.
- You are exasperated by the dizzy convolutions of C++.
- You suffer from nostalgia.
- You like to noodle around.
- You want to delay the onset of dementia.
- You want to impress your friends.
- You are terminally daft.
- All of the above.
Don't know about you, but I'm a 17.
> Who?
This book is for programmers. That is to say: ideally you should have some programming experience in order to gain the most from it. Maybe you have experience working in a high-level language, ideally C, or maybe Java or C# or C++. With a little previous experience tucked under your belt, you should have an intuitive feel for the material, and should have no difficulty following along. After all, almost all of the examples are complete programs and include instructions for assembling, linking, and executing the code on your Mac. The source code for the examples has been automatically inlined into the book after testing, to ensure accuracy. So too the screenshots of the executing sample programs. There should be no unpleasant surprises.
This is not a text book; you'll find very little here about data structures, and even less about algorithms. Neither is it a reference with exhaustive material about the instruction set. You can find that stuff in the Intel manuals. (See Appendix A.) Instead, it focuses on getting useful code written and running with as little fuss as possible. Try reading a chapter a day for a leisurely pace. There is hardly a spare word in this book, just enough to get the job done. I hope you like this style.
> Howto
This is a simple and useful, howto book. In it, you will find dozens of sample programs that you can copy and paste into your editor, save, assemble, link, and run. The emphasis is on small, complete programs that you can use as starter programs to jumpstart your own development.
The best way to learn any programming language is to write lots and lots of programs, and study lots and lots of examples. You might say, a program paints a thousand words. For best results, you should assemble, link, and execute the code samples as you go.
You're in the right place. So let's get started.
> Work in Progress
This online book is under development. When you see the icon below, note that the accompanying chapter is subject to improvement or change.

2. Installing the Tools
Before we write our first program, we need to install some tools. This can be a nuisance, but once it's done, it's done, and you shouldn't have to do it a second time.
> Installing the Command Line Tools
Open a terminal and run the xcode-select --install command; see Figure 1-2.
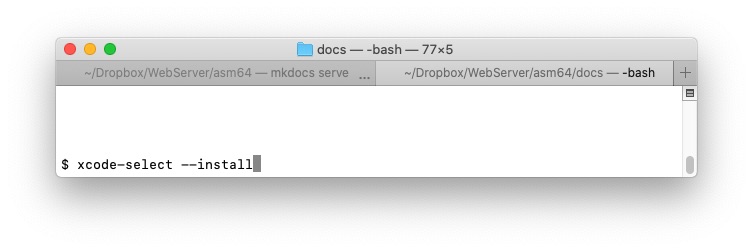
Figure 2-1: Installing the command line developer tools
!!! note "NOTE: Don't type the leading dollar sign. That's the command prompt. Your prompt may look different."
If you see the dialog in Figure 2-2:
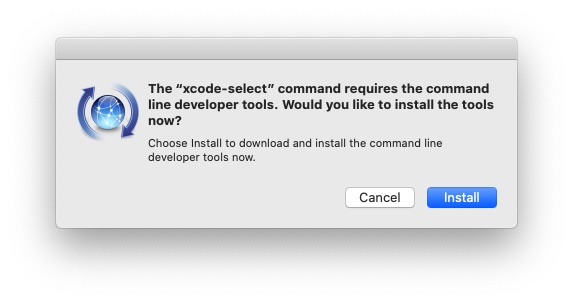
Figure 2-2: Confirm install
then go ahead and click Install. When the tools are installed click Done.
Then, execute the xcode-select -p command. This time you should get a message
like you see in Figure 2-3:

Figure 2-3: The command line developer tools are correctly installed.
This tells us that the Command Line Tools are correctly installed to
/Library/Developer/CommandLineTools.
Take a look in the /Library/Developer/CommandLineTools/usr/bin directory
(Figure 2-4) to see what else you've got. You'll see clang, make, python3,
swift, git, and many useful Unix developer tools:
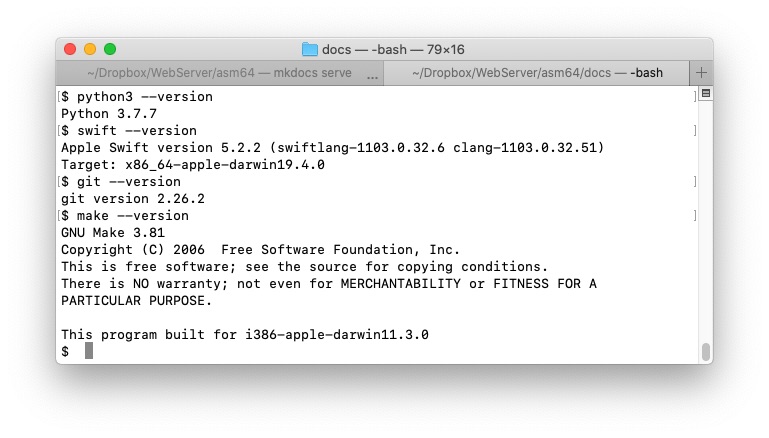
Figure 2-4: Some of the tools.
If you encounter any errors installing the command line tools, try installing Xcode first. It is available at the App Store. See Figure 2-5.
!!! note "NOTE: Xcode is Apple's integrated development environment (IDE) and toolkit for macOS development."
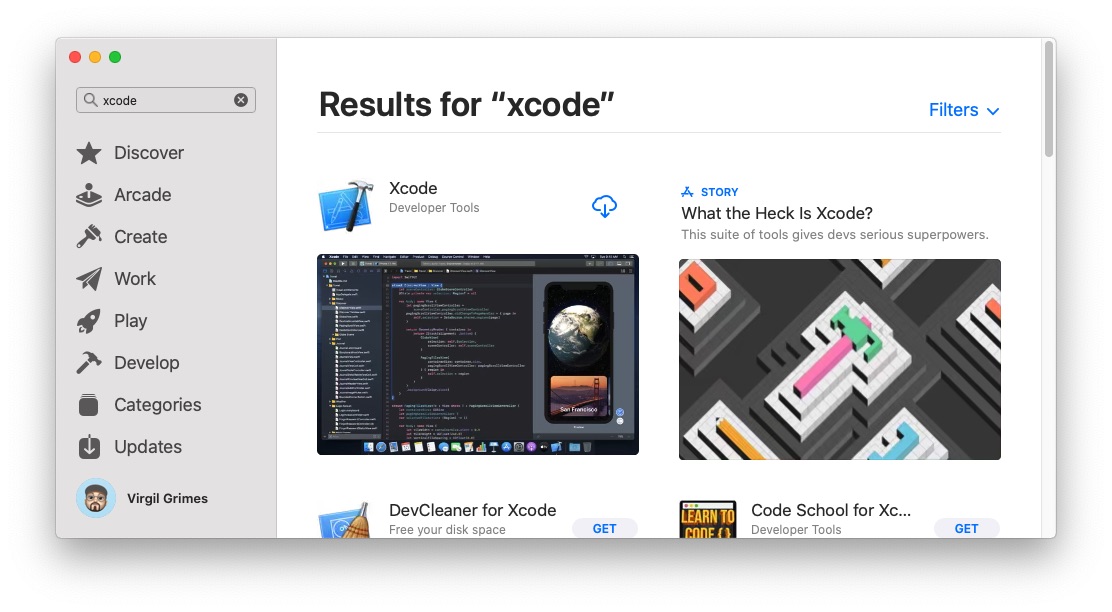
Figure 2-5: Xcode at the App Store.
> Installing NASM
Next, we'll need an assembler. There are several different choices, but we'll use NASM - the Netwide Assembler, https://www.nasm.us, since it uses Intel syntax. (There is a less popular AT&T syntax that we won't use here.) There may actually be a version of NASM in the Command Line Tools, but it will typically be outdated. So we use Homebrew to get an up-to-date version of NASM, with the simple command:
brew install nasm
or
brew upgrade nasm
If you don't have Homebrew on your machine, you don't know what you're missing: it opens up a world of free, packaged, Unixy software for your Mac. See Homebrew for more. If you don't have it, get it now and use it to install, or upgrade, NASM, as above.
> Choosing an Editor
You'll need a text editor to create your program source files. I like both Vim and BBEdit, although sometimes Vim requires a little more energy than I've got on a slow day. Here are several possibilities:
- Vim: multiplatform, free, fast, popular with nerds, raises money for charity. A good choice.
- BBEdit: Mac only, inexpensive, macOS-GUI-based, fast, easy. Apparently, it doesn't suck. I like it.
- Emacs: multiplatform, free, fast, powerful, steep learning curve. If you know Emacs, then use it. If not, this is not a good time to start.
- Atom: multiplatform, free, GUI-based, slow, a bit of a beast. I don't like it.
- Gnu Nano: a standard linux utility, free for macOS, but lacks features. Not a serious contender.
- Sublime Text: Mac/Windows/Linux, GUI-based. More
expensive than
BBEdit, and probably not worth it.
Note that we don't need a complex IDE (Integrated Development Environment) to do our work, just an editor, assembler, and linker. That's about it. We pretty much use the same commands to invoke the assembler and linker for every sample. We don't use makefiles anywhere. The emphasis is on simplicity throughout. In fact, you've probably never had it so easy.
> My Setup
For what it's worth, here is my setup:
- Mac Mini (2018)
- Acer R240HY Widescreen Monitor
- Redragon K552 Mechanical Keyboard
- AmazonBasics 3-Button USB Mouse
- macOS Catalina 10.15.5
- MacVim 8.2.539 (Mac-flavored Vim)
- BBEdit 13.1
- NASM 2.14.02 (the Netwide assembler)
- clang 11.0.3 (to compile a few C samples)
- mkdocs 1.1 (for building this online book)
- Git 2.26.2 (for version control)
I also use a 12-inch Macbook, but generally I prefer working on the Mini.
3. Hello World Version 1 - The syscall Version
Now it's time for our first x86-64 assembly language program. In homage to
Kernighan and Ritchie,
let's do a simple hello world program.
> Coding Hello World
Open your text editor and type in the Assembly code in Listing 3-1. Save it as hellov1.asm:
1 2 3 4 5 6 7 8 9 10 11 12 13 14 15 16 17 18 19 20 21 22 23 24 25 26 27 28 29 30 | |
Listing 3-1: hellov1.asm, our first program.
Note that the numbers in the left column are simply line numbers and are not part of the source code. They are there so that we can refer to lines by line number in the following discussion. If you hover over the top-right corner of this listing you'll see a copy icon. Click it to copy the program to your clipboard. Also note that a semi-colon (;) denotes a comment, so the first ten lines of the file are comments telling us the name of the program, its description, and how to assemble, link, and run the program respectively. As well as these full-line comments, most, if not all, assembly instructions are commented too. These comments are there for human readers. They are ignored by the assembler.
Note line 29 where we use db to reserve a string of bytes (an array or list
of characters, if you prefer) for our message. The different data types are
shown in Table 3-1.
In line 30, we calculate the length of the message. The $ denotes the current
address of the assembler. So $ - helloMsg is equal to the current address
minus the address of helloMsg which gives us the length of helloMsg.
When we assemble, link, and run hellov1, we get:
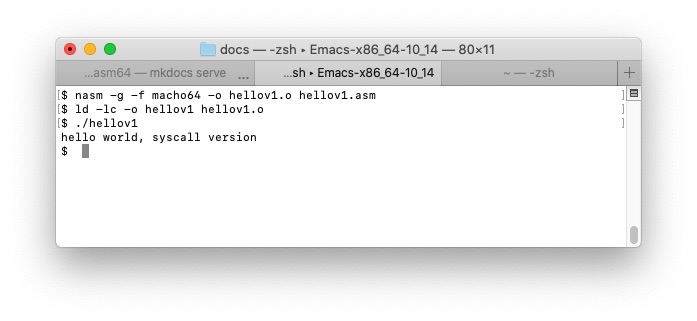
Figure 3-1: assembling, linking, and running hellov1.asm.
The program displays hello world, version 1 as expected.
> Data Types
When we program, we typically work with different data types. Table 3-1 shows the fundamental x86-64 datatypes and their C equivalents:
| x86-64 Data Type | Bits | Name | C Equivalent |
|---|---|---|---|
| db | 8 | Byte | char |
| dw | 16 | Word | short |
| dd | 32 | Double Word | int |
| dq | 64 | Quadword | long |
Table 3-1: The different data types.
Check Table 3-1 with this short C program:
1 2 3 4 5 6 7 8 9 10 11 12 13 14 | |
Listing 3-2: C Data Types.
When we run this we get the result shown in Figure 3-1.
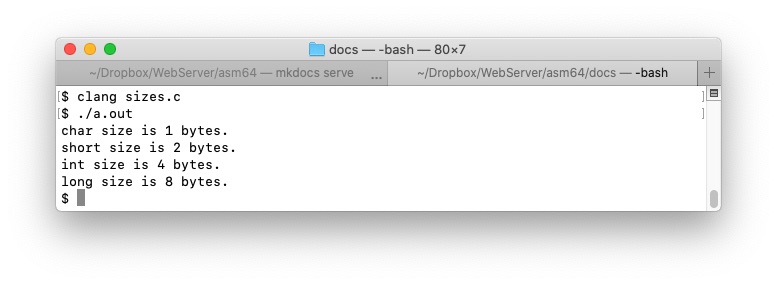
Figure 3-1: C Data Types.
> The syscall Interface
Wherever possible, I prefer to call the corresponding wrapper function from
the Standard C Library instead of using syscall directly. So you won't see too
many syscalls from here on. Note that the syscalls are different between
Windows, Mac, and Linux. Each machine uses different syscall numbers. So using
the Standard C Library instead, where you can, is a way to make your programs
portable. (Although the syscall interface is not the only portability issue.)
Having said that, let's have another look at i/o using syscalls:
1 2 3 4 5 6 7 8 9 10 11 12 13 14 15 16 17 18 19 20 21 22 23 24 25 26 27 28 29 30 31 32 33 34 35 36 37 38 39 40 41 42 43 44 45 46 47 48 49 50 51 52 53 54 55 56 57 58 59 60 | |
Listing 3-3: I/O Using Syscalls
When we run this we get the result shown in Figure 3-2.
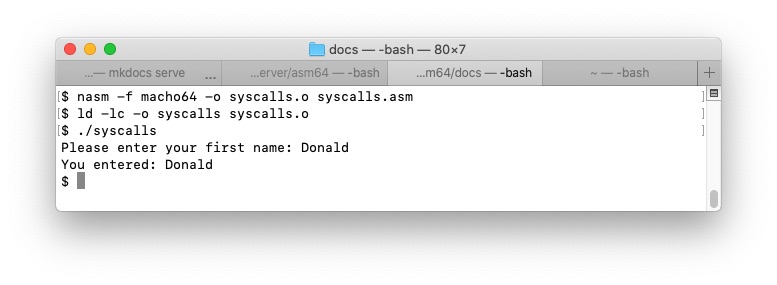
Figure 3-2: I/O Using Syscalls.
4. Calling the Standard C Library
In this chapter, we use the Standard C Library to do input and output. You'll be using the Standard C Library a lot, so you might like to get yourself a copy of P.J. Plauger's book, The Standard C Library.
We begin with a second version of hello world that uses the standard
puts(...) function to display a message.
> Hello World Version 2 - The puts(...) Version
In the next version of Hello World, hellov2.asm, we use the Standard C
Library function, puts(...), to display our message. It is a convenient way
to avoid reinventing the wheel with syscalls etc.
1 2 3 4 5 6 7 8 9 10 11 12 13 14 15 16 17 18 19 20 21 22 23 24 25 26 27 28 29 30 31 32 | |
Listing 4-1: hellov2.asm, another "https://cdn.getforge.com/daft.getforge.io/1593493837/hello world" program.
When we assemble, link, and run hellov2, we get the results in Figure 4-1.
Note the test of the return code with echo $?.
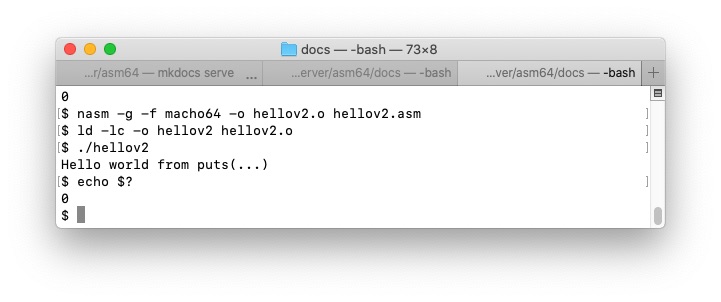
Figure 4-1: assembling, linking, and running hellov2.asm.
The program displays hello world, version 1 as expected.
In line 8 we declare the puts function as an external function. We add an
underscore in front of the the function name, as is usual when calling standard
library functions. Without the extern declaration, NASM will complain that the
puts symbol is undefined, and will stop with an error.
In line 20, we construct hellomsg. Since we'll be calling a C function,
we follow the C convention of terminating our message with a null, or zero, byte.
In line 13, we load the address of the message into the rdi register,
where puts(...) expects to find it.
In line 15, we make the call to puts.
Note that in line 12 we push rdi onto the stack to preserve it before
we overwrite it in line 13. We restore it in line 16 with pop rdi.
5. x86-64 Processor Architecture
Since macOS 10.15 Catalina, 32-bit applications are no longer supported by the kernel. This completes the gradual switch to 64 bit apps that has been underway for the past several years.
 |
This chapter is still under construction. For details of x86-64 architecture, check out the Intel manuals (link below.) |
6. Control Flow
So far, the samples we've seen execute one statement after the next until the
program ends. More complex examples will use statements that cause control
to be transferred depending on some condition. You have probably seen some
form of an if-else statement in C, or in some other high-level programming
language. Let's see how to implement this statement in Assembly Language.
> If-Else
Let's convert the following C snippet into Assembly:
1 2 3 4 | |
Of course, there is no if statement in Assembly, so we'll have to find a way:
1 2 3 4 5 6 7 8 9 10 11 12 13 14 15 16 17 18 19 20 21 22 23 24 25 26 27 28 29 30 31 32 33 34 35 36 37 38 39 40 41 42 43 44 45 46 47 48 49 50 51 52 53 54 55 56 57 58 59 60 61 62 63 64 65 66 67 68 69 70 71 72 73 74 75 76 77 78 79 80 81 82 83 84 85 86 87 88 89 90 91 92 93 94 95 96 97 98 99 100 101 102 103 | |
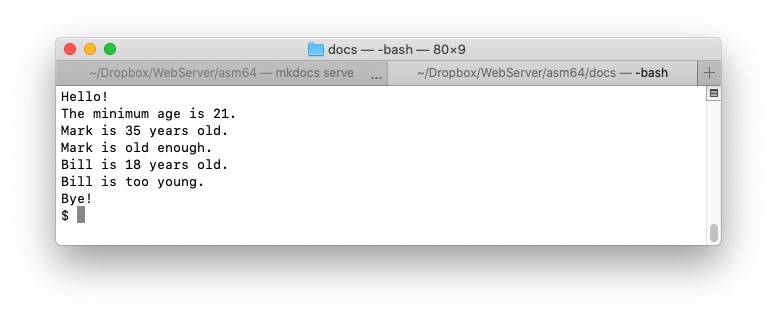
Note that there are many other jump statements apart from jge:
| Instruction | Meaning |
|---|---|
| jmp | jump unconditionally |
| je | jump if zero |
| jz | jump if zero |
| jne | jump if not zero |
| jnz | jump if not zero |
| jl | jump if < 0 |
| jle | jump if <= 0, |
| jnl | jump if not < 0, same as jge |
| jnle | jump if not <= 0, same as jg |
| jg | jump if > 0 |
| jge | jump if >= 0 |
| jng | jump if not > 0, same as jle |
| jnge | jump if not >= 0, same as jl |
> Loops
As a programmer, you have encountered various while, do, and for loops
in your day. Before we look at the Assembly equivalents, let's first look at
a for(;;) loop in C.
>> A For Loop in C
1 2 3 4 5 6 7 8 9 10 11 12 13 14 15 16 17 | |
When we compile and run this, we get:

>> A For Loop in Assembly
1 2 3 4 5 6 7 8 9 10 11 12 13 14 15 16 17 18 19 20 21 22 23 24 25 26 27 28 29 30 31 32 33 34 35 36 37 | |
When we assemble, link, and run this, we get:

7. Working with Macros
In this chapter, we explore the creation and use of macros. A macro is a bit like a function call -- see next chapter -- but instead of transferring the flow of control, the called code is generated inline. (We'll learn more below.)
> A First Macro
If you are familiar with C, you are already familiar with macros. To turn a
piece of code into a macro, we simply surround it between %macro and
%endmacro directives, as below. In this case, we create a macro called say
which takes one parameter, a string (the message) and displays it on the
console. The following example makes three separate calls to display three
different messages.
1 2 3 4 5 6 7 8 9 10 11 12 13 14 15 16 17 18 19 20 21 22 23 24 25 26 27 28 29 30 | |
Once we've written a macro, no matter how complex, we can call it with a
simple one-liner. This is an example of so-called modular programming.
The main code can be looked upon as Manager Code, while the macro is an
example of Worker Code. In our example we design a general-purpose say
macro. When we call it we pass the message we want to display as an argument
to the macro, in this case a hellomsg, followed by a byemsg, followed by
a frenchmsg:

> The %include Directive
When we have a bunch of macros, we can gather them together in a separate
file, and simply include them by using the %include assembler directive.
This is the macros file (mymacros.asm):
1 2 3 4 5 6 7 8 9 10 11 12 13 14 15 | |
See the following chapter for a discussion of the stack including the
lowdown on push and pop instructions.
This is the main file (msgsay2.asm):
1 2 3 4 5 6 7 8 9 10 11 12 13 14 15 16 17 18 19 20 21 22 23 24 | |
Note the %include "mymacros.asm" directive on line 8.
As you might imagine, it would speed development to have a large
mymacros.asm file of your own, with lots of tried and tested macros. In
general, when you repeatedly use a series of instructions several times in
your programming, you should put those instructions in a macro and put the
macro in a file such as mymacros.asm. Then simply use the %include
directive to include the macro file wherever you need it.
8. Working with Functions
In this chapter, we explore the creation and use of functions. We also learn
how to leverage the Standard C Library by calling C functions from our assembly
programs. But before we do that, we need to learn about push, pop, and the
stack. There is some overhead in calling a function. Control is transferred to
the address of the function in memory using a call command. The function code
then executes and returns control to the caller. If you find this to be too
much of an overhead, in many cases you can use a macro instead and avoid the
call/return burden. However, this burden is typically not significant.
> The Stack
> Calling C Functions
We've already written a program that calls a C function. Remember,
hellov2.asm called the C puts(...) function, like so:
1 2 3 4 5 6 7 8 9 10 11 12 13 14 15 16 17 18 19 20 21 22 23 24 25 26 27 28 29 30 31 32 | |
puts(...) takes a single argument, a null-terminated string, the relative
address of which is passed in the rdi register, as above.
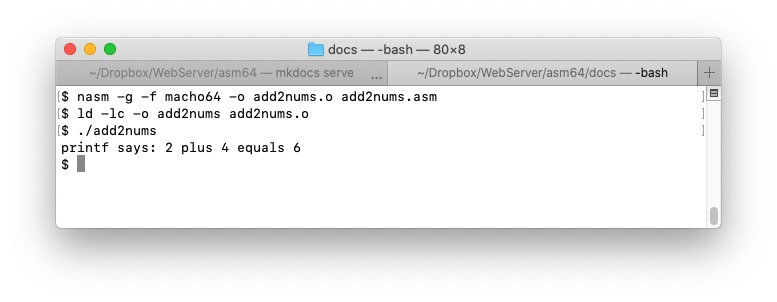
Now, let's write our own simple program to add two numbers:
1 2 3 4 5 6 7 8 9 10 11 12 13 14 15 16 17 18 19 20 21 22 23 24 25 26 27 28 29 30 31 32 33 34 35 36 37 38 39 40 41 42 43 44 45 | |
When we assemble, link, and run this, we get:
> Writing a Function
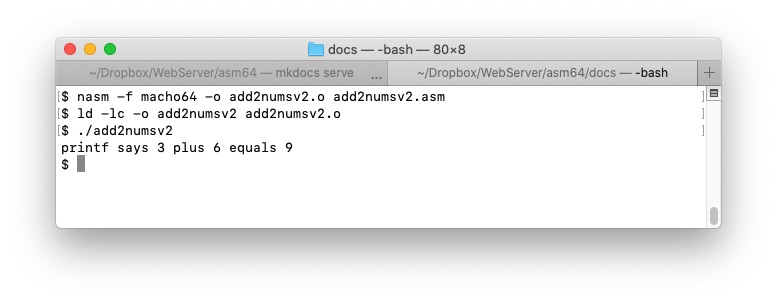
Now let's write our own function to add two numbers;
1 2 3 4 5 6 7 8 9 10 11 12 13 14 15 16 17 18 19 20 21 22 23 24 25 26 27 28 29 30 31 32 33 34 35 36 37 38 39 40 41 42 43 44 45 46 47 48 49 50 51 52 53 54 55 56 57 58 59 60 | |
When we assemble, link, and run this, we get:
Although most registers are general purpose, there is a convention for passing arguments to a function and returning a value:
| Register | Description |
|---|---|
| rax | return value |
| rdi | 1st function argument |
| rsi | 2nd function argument |
| rdx | 3rd function argument |
| rcx | 4th function argument |
| r8 | 5th function argument |
| r9 | 6th function argument |
This information is also useful if you need to use a particular function from
the Standard C Library. You should expect to find the function arguments in
the order specified in the above table. Lets test this by calling the
strlen(...) function to find the length of a string. The C header
declaration is:
size_t strlen(const char *str)
So our call should look like:
1 2 3 | |
Let's test this:
1 2 3 4 5 6 7 8 9 10 11 12 13 14 15 16 17 18 19 20 21 22 23 24 25 26 27 28 29 30 31 32 33 34 35 36 37 38 39 40 | |
We assemble, link, and run this to get:
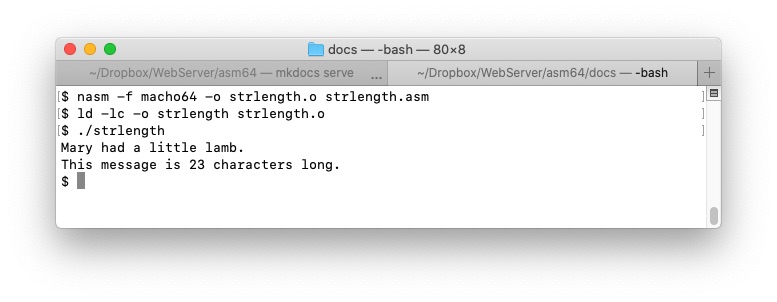
This is the correct answer, and so our faith in the previous table is reinforced:
- the first function argument (mymsg) is indeed passed in
rdi, - while the length is returned in
rax
as the table predicted.
> Working With Local Variables

> Working With Command Line Arguments

9. Debugging
No matter how smart you are, you'll make the occasional programming error, and you'll need the debugger to rescue you. Using a debugger is also a great way to learn Assembly Language programming. We'll use Apple's LLDB, (Low Level Debugger).
> Codesigning or Not?
Since macOS Lion, the Mac has a security feature called Gatekeeper. It requires that LLDB be codesigned before use. Unfortunately, codesigning is a tedious and painful process, and I like to avoid it if I can. So I simply switch off codesigning on my development machine. It may not be the recommended solution, but it is a simple expedient. If you want to join me on the dark side, see Figure 9-1.

Figure 9-1: Switch off codesigning: sudo spctl --master-disable
> Debugging a Simple Program
Here's a simple program to add two numbers and store the result. We've seen it earlier:
1 2 3 4 5 6 7 8 9 10 11 12 13 14 15 16 17 18 19 20 21 22 23 24 25 26 27 28 29 30 31 32 33 34 35 36 37 38 39 40 41 42 43 44 45 | |
Listing 9-1: add2nums.asm, add two numbers, display result.
Note the -g option on line 5, the nasm command line. It causes nasm to
include symbolic debugger information in the object file. This will enable
us to see, and use, symbol names in the debugger.
Launch the debugger and load this program, as follows:
1 | |
See Figure 9-2.

Figure 9-2: Launching lldb on add2nums
Now, set a breakpoint on line 16 where the action starts:
1 | |
Then run to this breakpoint.
See Figure 9-3.
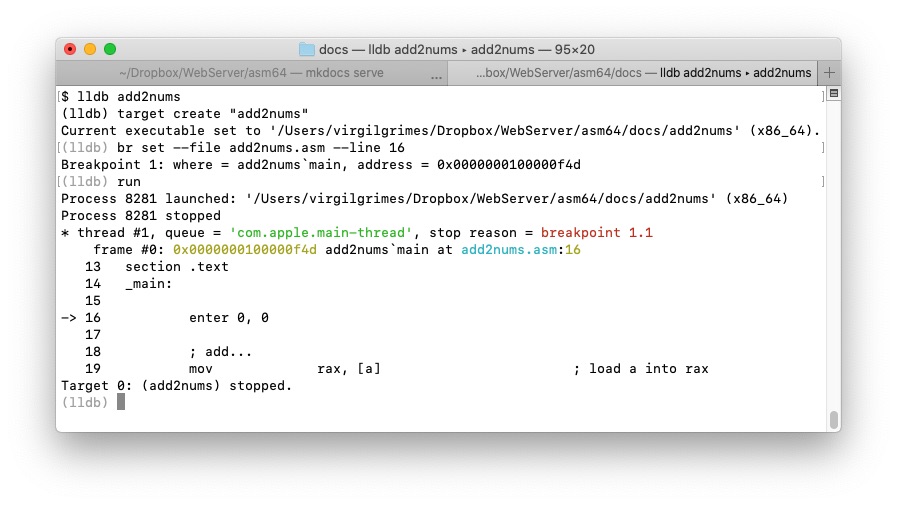
Figure 9-3: Making a breakpoint
Now, use the next (or n) command to step over the addition routine.
See figure 9-4.
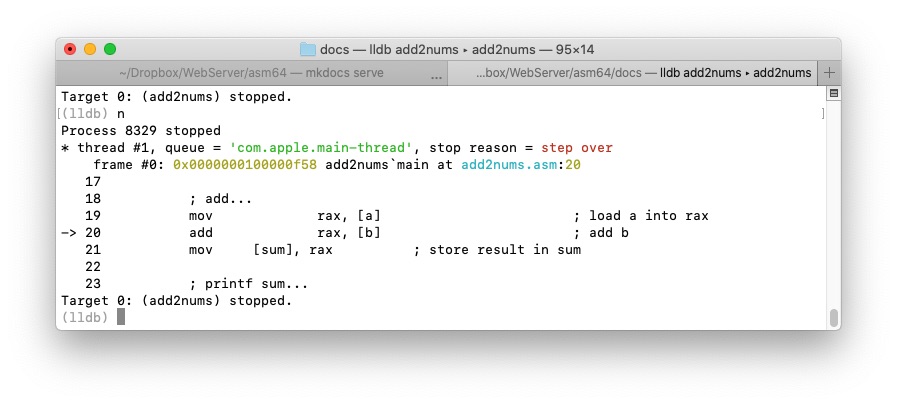
Figure 9-4: Stepping through the program.
An arrow on the left side of the screen points to the instruction to be
executed next. Press n to execute the add instruction, then n again
to store the result in sum. With the addition complete, it is time to
examine our variables - see Figure 9-5.
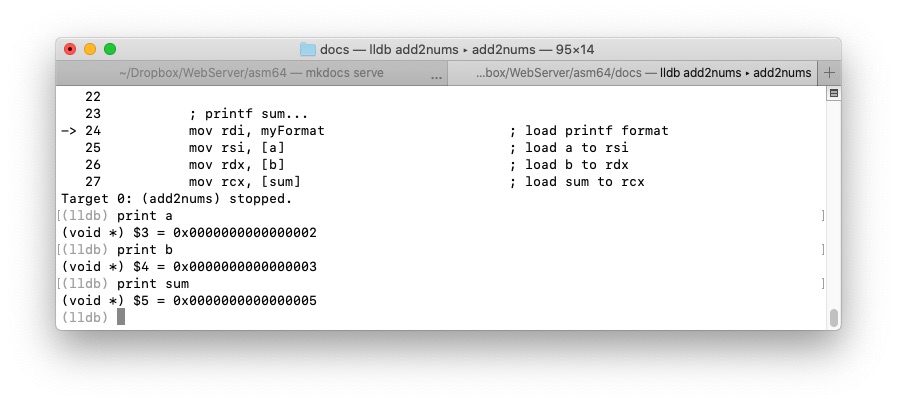
Figure 9-5: Printing variables.
We see that:
- a = 2
- b = 3
- sum = 5
as expected.
With LLDB, you can alter variable and register values, manipulate control flow, and generally tweak your code in pursuit of errors.
> More LLDB
This is just a taste of what LLDB can do. A manual for the LLDB debugger is available at https://lldb.llvm.org.
As an exercise, try changing values inside lldb using the
debugger expr command.
More debugging coming soon.

10. Reading and Writing Text Files
If you need your data to have a life beyond your program, you'll need to store your results in a file. In this chapter we learn how to write and read text files in Assembly. We make use of the Standard C Library functions to manipulate our files because these functions are easy, convenient, and powerful. There is no better way.
A plain text file is the lowest common denominator when it comes to data storage. It is a simple, human readable, everlasting data format. As such, it can be relied upon to be readable and writable without special software into the distant future. This is in contrast to binary files with non-human-readable data, that require special software (e.g. spreadsheet systems, word processors, and database management systems, for example) to read and write the data. For example, Wordstar documents, once prolific, are now practically unreadable since the software that created them is long since defunct. On the other hand, a humble plain text file lives on.
With just a little program redesign, you can usually use plain text instead of a binary format. For the simplicity that plain text brings, it may be worth it.
> Writing a Text File
Let's begin by creating and writing a text file, named mary.txt.
1 2 3 4 5 6 7 8 9 10 11 12 13 14 15 16 17 18 19 20 21 22 23 24 25 26 27 28 29 30 31 32 33 34 35 36 37 38 39 40 41 42 43 44 45 46 47 48 49 50 51 52 53 54 55 56 57 58 59 60 | |
I've interspersed some puts(...) calls to display informational messages as
the program executes. (This is the poor man's debugger.) Note, also, that
there is no error checking in this small example. For example,
if fopen(...) fails, the program will still attempt to write the file
with erroneous results. Adding error checking is left as an exercise.
We assemble, link, and run this program to get:
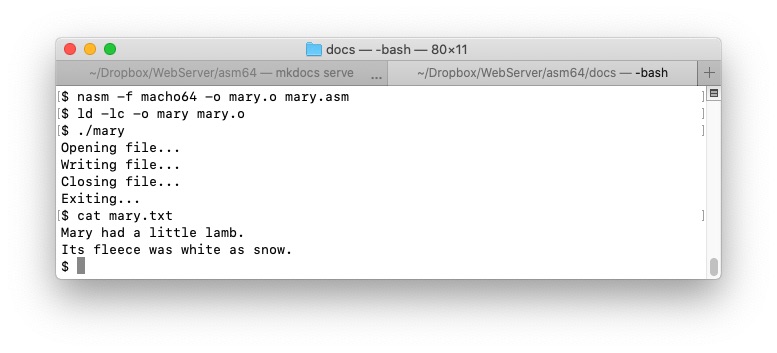
Using fprintf(...), instead of fputs(...), to write this text file is
also left as an exercise. (Remember to terminate each record with a newline
since, unlike, fputs(...), fprintf(...) does not add one by default.)
> Reading a Text File
Now let's see how to read the file we've just created:
1 2 3 4 5 6 7 8 9 10 11 12 13 14 15 16 17 18 19 20 21 22 23 24 25 26 27 28 29 30 31 32 33 34 35 36 37 38 39 40 41 42 43 44 45 46 47 48 49 50 51 52 53 54 55 56 57 58 59 60 61 62 63 64 65 66 | |
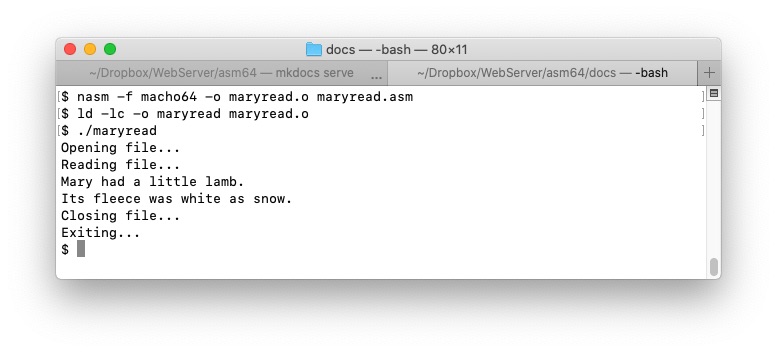
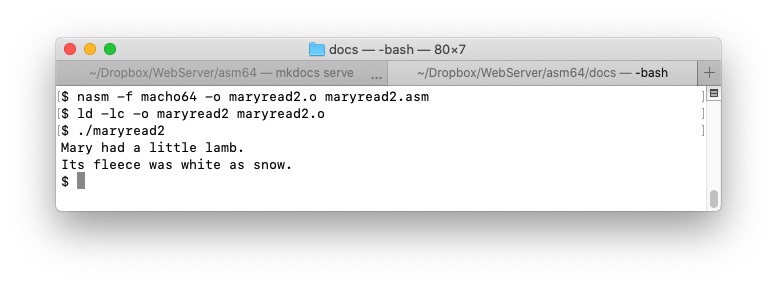
Now this works well only because we know in advance that there will be only two lines in the file. A more flexible program will read the records in a file until it reaches the end of the file:
1 2 3 4 5 6 7 8 9 10 11 12 13 14 15 16 17 18 19 20 21 22 23 24 25 26 27 28 29 30 31 32 33 34 35 36 37 38 39 40 41 42 43 44 45 46 47 48 49 50 51 52 53 54 | |
11. Working with Numbers

12. Disassembling a Program

13. Conclusion
Apologies in advance for the following politically doubtful joke. If you feel offended, try reversing the speakers and see if that makes you feel better. On a lonely summer's night, with nobody to stay my hand, I couldn't resist it.
> The Lottery
The following sample program demonstrates the definition and repeated use of a macro. It also says something about money and betrayal.
1 2 3 4 5 6 7 8 9 10 11 12 13 14 15 16 17 18 19 20 21 22 23 24 25 26 27 28 29 30 31 32 | |
Assemble, link, and run, as follows:
I'll miss you too.
Appendix A: Further Sources
> The Apple Developer Website
If you are serious about Mac programming, you should hang out at the Apple Developer Website.
> NASM User Manual
The NASM User Manual is available at https://www.nasm.us/doc/. It is a great source of information, made available in a fully-indexed static website.
> NASM Website
The NASM website is available at https://www.nasm.us. It contains lots of useful NASM information, and a busy forum for users.
> LLDB Documentation
A manual for the LLDB debugger is available at https://lldb.llvm.org.
> Intel Manuals
The Intel manuals are available at https://software.intel.com/content/www/us/en/develop/articles/intel-sdm.html. They describe the architecture and programming of x86-64.
Appendix B: About the Author
VIRGIL GRIMES
GrimesHimself@gmail.com
I have more than thirty-five years experience as a programmer and writer, both in a professional capacity, and as a hobbyist. During this career, I have programmed casino gaming machines on bare metal using PLM-80, IBM mainframes in Rexx, DOS PCs in C, Microsoft Windows machines in Visual Basic, Perl and C#, and Apple Macs in C and Assembly Language. I have also written extensively.
> About this Book
This book is a labor of love. When I first began dabbling in x86-64 Assembly Language on the Mac, the only books I could find targeted Microsoft Windows or Linux, or they didn't cover the 64-bit programming model, or they used AT&T syntax. I couldn't find the right book, so I decided to write a book of my own, devoted exclusively to 64-bit Assembly Language programming using NASM on the Mac. You are reading the result. It is an exercise in self-indulgence. I'd rather be writing it than wrestling with some multiple inheritance problem, or doing my chores.
While I have done my best to ensure that my work is error-free, I cannot guarantee that it is so. Please use at your own risk.
If you find errors, or you have comments on this book, or suggestions for improvement, please consult Appendix E for contact details. I'll do my best to respond.
> Microsoft .Net for Programmers
I am also the author (as Fergal Grimes) of the well-received Microsoft .Net for Programmers. See Appendix D for reviews.
> Hire Me
Together We Can Make Such Sweet Music.
>> Got a Writing Project?
If you have a writing project that needs a professional hand, please contact
me at GrimesHimself@gmail.com. Maybe you need to document, describe, or
teach a product, an API, or a library. If so, talk to me. I'm based in
Monterey, California, about an hour from Silicon Valley, and I have all the
tools I need to work remotely.
Appendix C: Building this Book
I call this a book even though it may never be a bound paper book. Instead,
I used MkDocs (https://www.mkdocs.org) to build it
as a static website. After all, paper documents quickly go out of date,
whereas a well-maintained static website can have a much longer shelf-life.
(It also means that I get to learn MkDocs, and that's cool.)
I recommend you create your documentation as a static website too. There are lots of good static website generators (SSGs) out there. The following are the most popular:
- Bills itself as the world's fastest framework for building websites.
- Natively supports Markdown and HTML for content markup.
- Also supports asciidoc and reStructured text.
- Bills itself as the static web server with built-in preprocessing.
- Markdown-based.
- Started in 2008.
- The most popular SSG
- Works well with GitHub Pages.
- Renders Markdown and Liquid templates, whatever they are.
- Awkward to install.
- Originally created for the Python documentation project.
- Popular with Python people.
- "Professional sites right out of the box," according to what it says on the tin.
- Uses reStructuredText for markup.
- I haven't used it.
- Uses Asciidoc for markup (also used by O’Reilly Media, Inc. to create their tech books.)
- Asciidoc is more capable than markdown.
- Easy to install:
brew install asciidoctor - A solid professional solution.
- A good choice.
- Also popular.
- Gorgeous sites right out of the box.
- Easy to install:
brew install mkdocs - Easy to use.
- Markdown-based.
- Robust
includeplugin. (Great for pulling in code listings) - Tables support.
- My choice for this site.
Appendix D: Reviews for MICROSOFT .NET FOR PROGRAMMERS
I am also the author (as Fergal Grimes) of the well-received Microsoft .Net for Programmers.
Here are some of the Amazon reviews of that book:
- “This book is the best I have seen on what .NET can do.” — A Customer
- “Excellent C# and .NET book” — Amazon Customer
- “Well organized and well written” — Rich
- “This book is very well written, both technically and grammatically (which is something you can’t say for all computer books).” — Eric
- “Incredibly succinct” — Srihari Mailvaganam
- “Excellent Presentation of Major .NET Features and Fun, Too” — H. Hayes
- “Well-written with a great, practical example” — Amazon Customer
- “Grimes does an excellent job of detailing .NET in a clear and concise text.” — David E. Patrick
- “I love this approach” — A Customer
- “An excellent introductory real-world book” — Phil Lee
- “A holistic approach to .NET…” — M. Miller
- “Great book for the intermediate to advanced programmer” — Erin Welker
- “Excellent choice — realworld approach” — G. Huber
- “An Excellent Overview” — dasousa
- “Strong from cover to cover. Now top 5 in my favorites list” — B. Ogatly
- “I have a bookshelf full of programming books, and this is the first time I’m motivated to post a positive review online about a book.” — James Lin
- "An innovative and stylish book. Great structure. Each chapter follows naturally.” — Dexter Collins
Appendix E: Reach Out
Please reach out and introduce yourself. You can reach me at:
- email:
GrimesHimself@gmail.com - twitter:
@GrimesHimself
> Comment on this Site
If you are commenting on a specific program sample, or reporting a bug, please include the listing number and line number.